An adaptation of a classic Civil War game
NOTE: Players will want to disable chance-roll notifications under Game>>User Notifications. The game contains many chance rolls, and outcomes are otherwise noted. The American Civil War was fought over four bloody years, from the firing on Fort Sumpter by secessionists in April, 1861 to the surrender of Gen. Lee at Appomattox Courthouse in April, 1865. The war had been building for a long time, and indeed, seven states seceded from the Union and formed the Confederacy before Lincoln even took office in March of 1861. In the weeks following the Battle of Fort Sumpter and Lincoln's call for volunteers to put down the rebellion, four more states seceded and joined the Confederacy. Our game opens in July, 1861 when both sides, though still disorganized, were armed and ready for all-out war. Each turn represents a month (two months in the winter). The game may last up to 40 turns or end sooner if one side achieves its victory objectives. Gameplay The North player starts with 12 militia infantry units, the South with eight. During each turn, units may be moved separately or in groups, battles will be fought, militia may be promoted to higher-quality units, and new militia may be recruited. The North moves first, then the South, alternating until one player wins. TripleA players take note: While capturing enemy territory has value in the game, territories do not produce PUs for spending. PUs are granted in other ways as the game progresses. Details below. The sequence of play each turn:
The units There are two types of units, infantry and cavalry. Each comes in one of three ranks: militia, veteran, or crack. Higher-ranking units are better fighters. Each turn, players have the opportunity to promote one or more units to the next-highest rank.
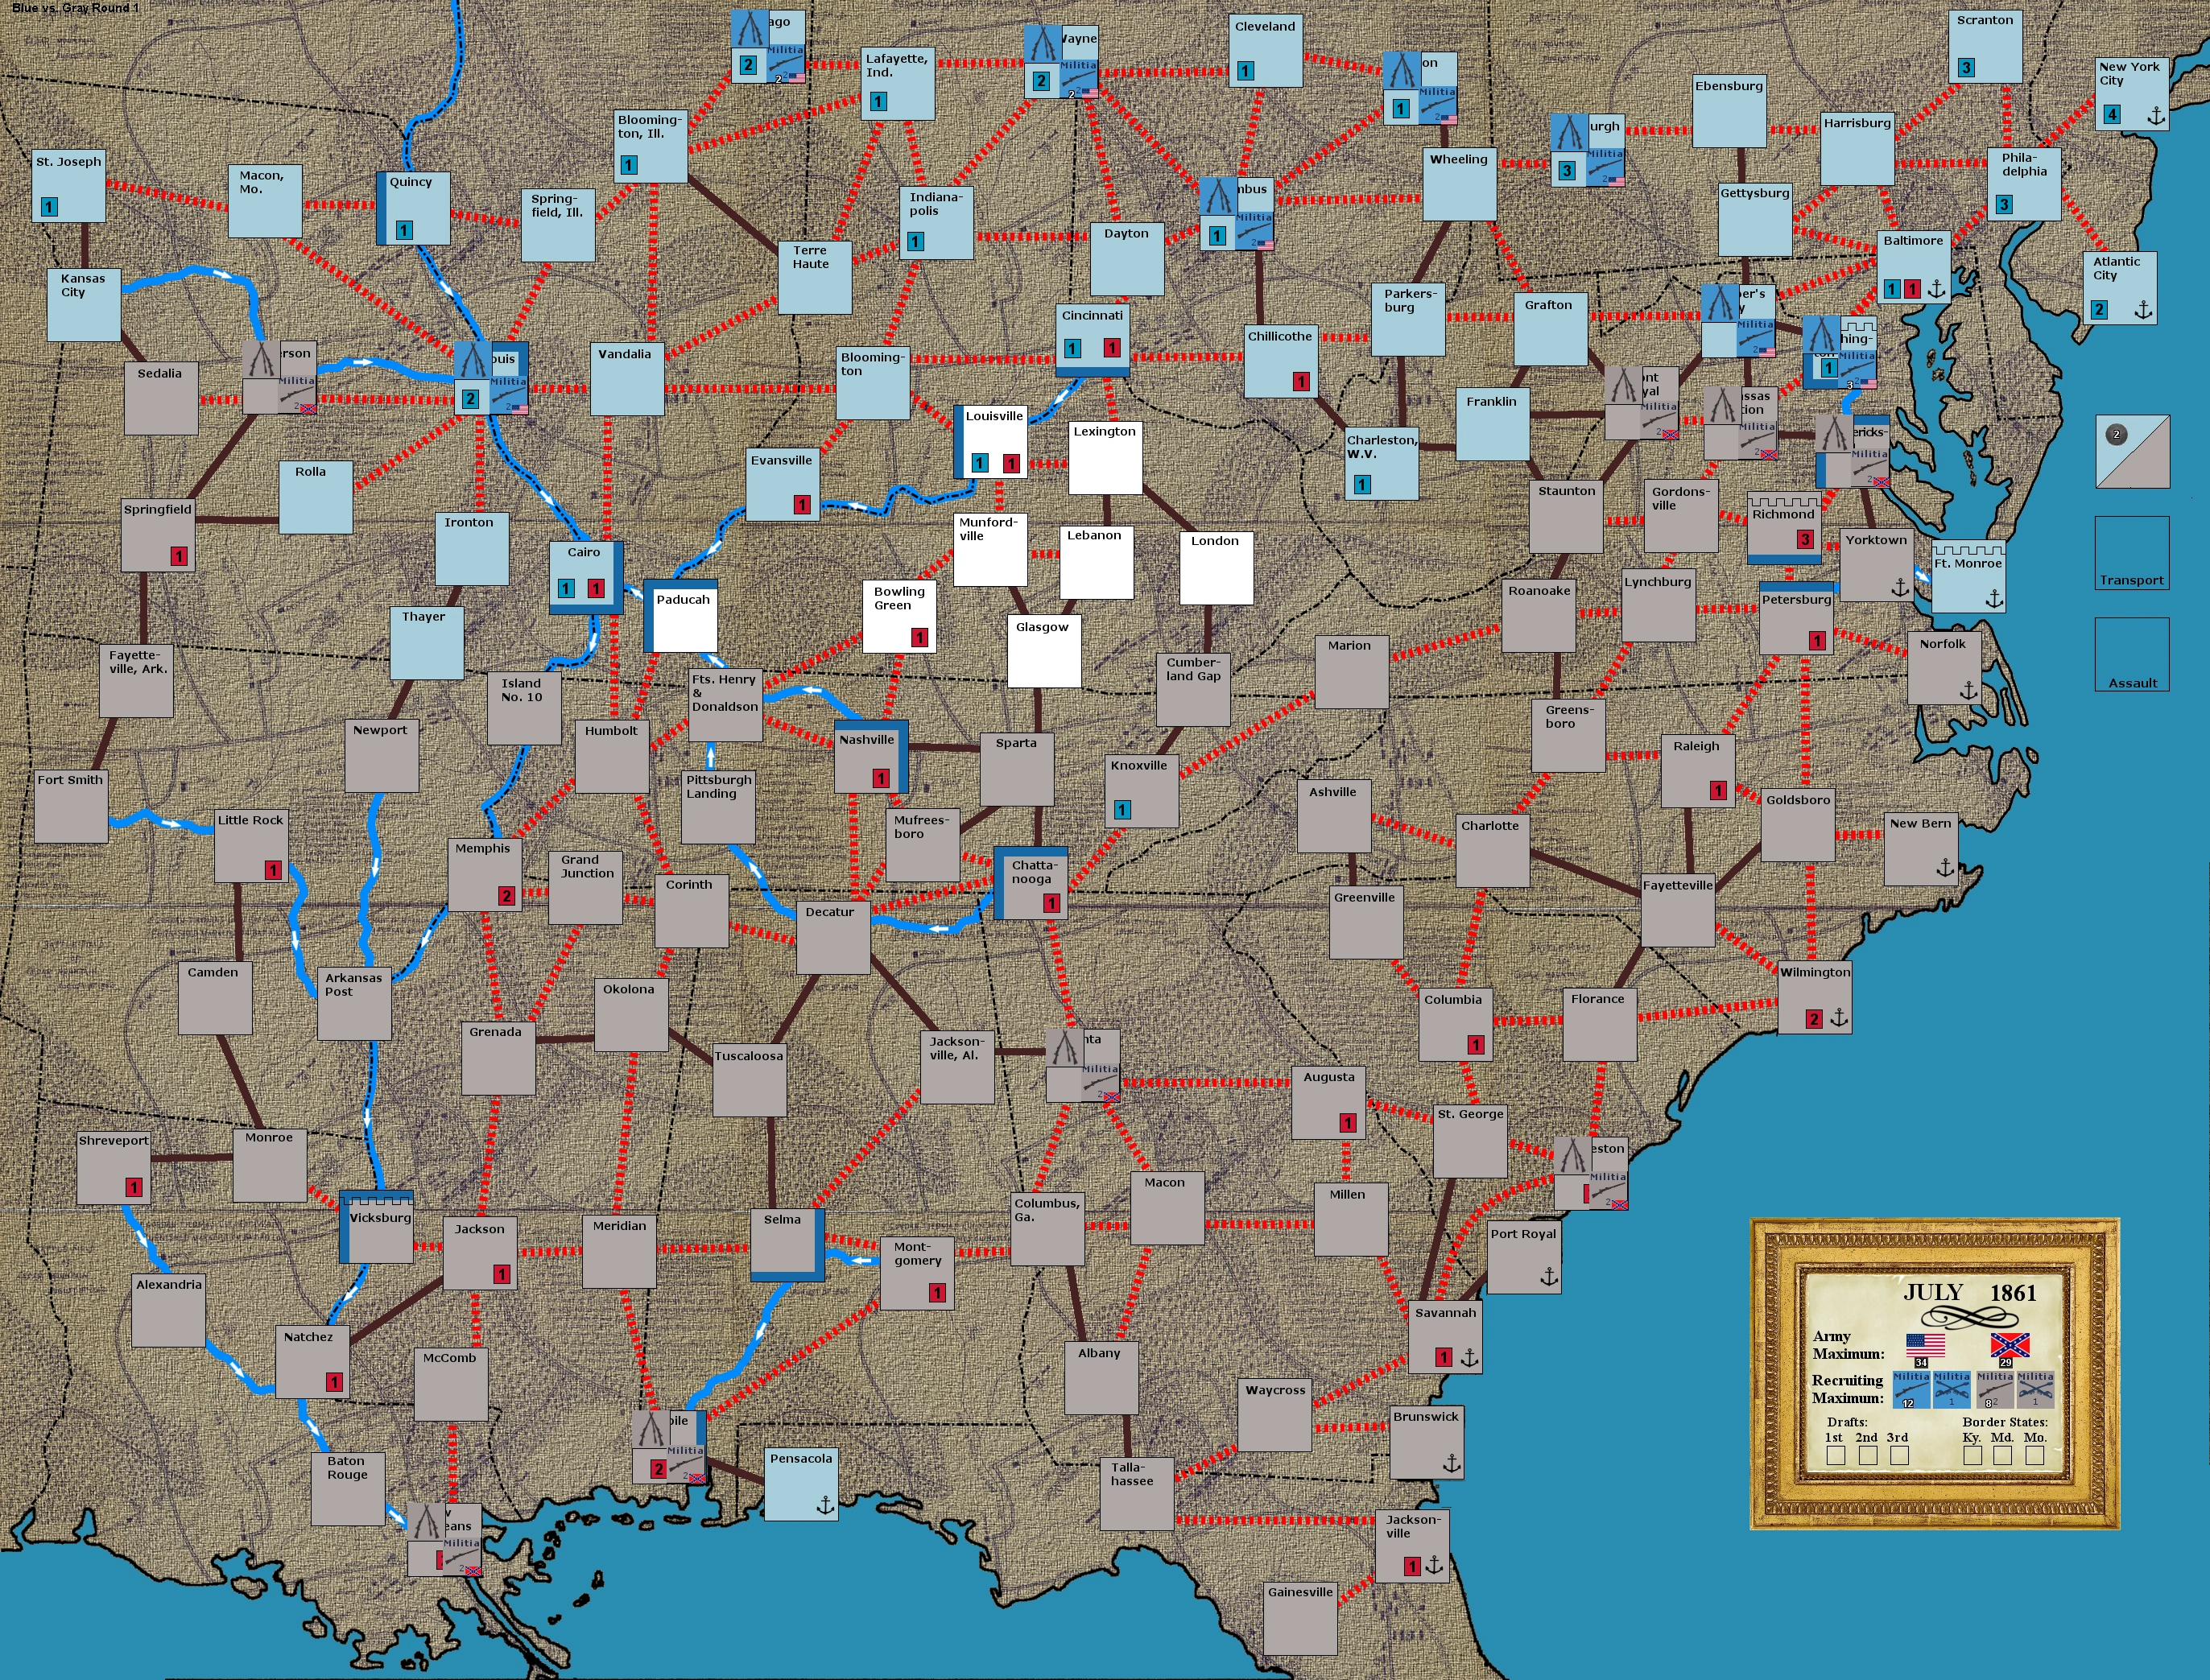
There is a calendar in the lower-right corner of the map which keeps track of the months and years as the war progresses, as well as other information explained below. Troop placement and battle happen in the boxes representing cities or other points of action in the war. Ownership of boxes is represented by the colors: blue for North, gray for South, and white for neutral (as Kentucky was at the outset of the war). |
Movement is only between boxes over various types of connections: roads (brown), rail (red), or rivers (blue).
Nashville is one example of a city joined to others by all three types of connection. | |||||||||||||||||||||||||||||||||||||||||||||||||||||||||||||||||||||||
{| border="0" cellpadding="5"
| align="center"|
| align="left" valign="top"|The Union player also has access to two forms of naval moves, represented by the boxes labeled transport and assault in the Atlantic.
The transport box can be used by the Union player on any turn to move troops from one friendly port to another.
Under special circumstances, the Union player may also perform a naval assault, using the assault box to move troops to an enemy port.
The North's naval superiority throughout the war gives it these advantages in the game, and others involving rivers, not enjoyed by the South. |- | align="center"| | align="left" valign="top"|There is also a "dice box" where both Union and Confederate dice rolls are shown.
Two important rolls happen for each side during the turn; the results are displayed in the dice box.
|}
MOVEMENT
At the start of each round, all units are considered encamped and cannot move. To disencamp an army, a player must give it a march.{| border="0" cellpadding="5"
| align="center"|
| align="left" valign="top"|The camp icon -- three rifles stacked in a tripod -- is placed in every city containing an army after each move. That army is encamped and cannot move until it's given a march.
|-
| align="center"|
| align="left" valign="top"|The march icon -- a wax-sealed envelop containing orders for an army -- removes a camp when placed, thus giving the army a "march."
|}
An army with a march can move to any connected box.
Units may all move together to the same destination, or each can move to a different destination, or some can move and some remain, in any combination.
Cavalry units may move 2 boxes on any given march, moving through any intervening box which does not contain enemy troops. Infantry may move 1.
Moving into a box containing enemy units results in battle, resolved in the next phase.
Transportation lines Three types of transportation lines enable troops to move differently. They function like naval transports in other TripleA games except they do not move; units embark and disembark in one move. They appear before marches are placed, and only where movement rules allow them. They disappear after the march, taking any troops left on board with them -- units must embark and disembark on the same march, or be lost, presumably to desertion, what with being left on their own at a train station or boat dock and having just been paid and all.
Trains allow infantry to move along rail lines from one friendly box to another via a friendly box in between, provided all three are connected by rail. They are not available if either the destination box or the intervening box is under enemy control.
In this example, the Union infantry in Cincinnati has a march (meaning the camp has been removed). Among its movement options are the train icons at Dayton and Bloomington. From either of those, it can disembark to any friendly box connected by rail, effectively moving two boxes.
No train icon appears at Chillicothe, however, since the only destination joined by rail -- Parkersburg -- is in enemy hands. Troops cannot use trains to move into enemy territory.
Cavalry may board trains, but it's redundant as they can move two boxes anyway.
Boats allow infantry to move two boxes by river in a fashion similar to trains along rails. However, river movement is not restricted by ownership of the destination or intervening box. Boats still appear if the box is under enemy control, but unoccupied, and troops may disembark from boats into enemy territory, even into battle.
Cavalry may board boats, but it's usually not necessary as they can move two boxes anyway, even along rivers, so long as there's no enemy army in the first box moved into.
In this example, the Confederate infantry at Chattanooga has several movement options involving transportation lines. It could move by train to Nashville via Musfreesboro or Decatur, or to Corinth via Decatur. Or it could move by boat via Decatur to Pittsburgh Landing, even though that box is under Union control.
In this example, since the Union controls Decatur, the train icon does not appear there. However, the boat icon does and the Confederate infantry in Chattanooga could still use it to attack Pittsburgh Landing.
In this example, since there's a Union army in Decatur, neither the train nor the boat icon appear there.
Trails allow for a special kind of cavalry move called a jump move. Cavalry can use trails to "jump" around enemy infantry in an adjacent box to any other connected box, as long as none of the connections involved are rivers.
In this example, the Confederate cavalry at Front Royal can use the trail at Harper's Ferry, represented by a horse icon, to jump around the infantry there and attack Washington, Baltimore, or Gettysburg.
However, cavalry may not jump a box containing enemy cavalry. No trail icon would appear at Harper's Ferry, in the above example, if the Union had a cavalry unit there.
Infantry may not use trails.
Cavalry may not jump move along rivers. But....
Downriver jump moves Another advantage enjoyed by the North due to its naval superiority is the downriver jump move. This enables infantry or cavalry to jump enemy unites in a box, as long as the first leg of the move is downriver and the destination box contains no enemy army.
River flow direction is indicated on the map by white arrows in the rivers.
In this example, the Union army at Jefferson City can't get through St. Louis by train or trail, but the boat icon appears since a downriver jump move is legal. The cavalry in St. Louis prevents a cavalry jump move, but both cavalry and infantry may make the downriver jump to Cairo.
In this example, the North cannot make a downriver jump move from Jefferson City to Cairo, since there's an enemy army in Cairo. Downriver jump moves cannot take units into battle.
Finally, here we see a similar situation, but no boat appears at St. Louis since the direction of movement would be upriver for the army at Cairo. Jump moves are not allowed upriver.
Confederates block downriver jump moves
The Union may not execute a downriver jump move if there is also a Confederate army in another city upriver of the city to be jumped. For example:
{| border="0" cellpadding="5"
| align="center"|
| align="left" valign="top"|The Union army at Memphis looks like it should be able to jump the Confederates at Arkansas Post and hit Vicksburg. But the boat icon doesn't appear.
The presence of another Confederate army also upriver of Arkansas Post -- at Little Rock -- is close enough to intervene, blocking the downriver jump.
|}
Garrisons and blitzing
Troops may move through unoccupied enemy territory on their way to their final destination, and it temporarily changes color to the moving player's, but it is not captured.
For instance, a cavalry unit could pass through an unoccupied enemy city as one of its two moves on a march, but end the march in another city. An infantry unit could do the same thing in two marches. This is called blitzing, but unlike in other TripleA games, the city blitzed through is not captured and reverts to its original color.
Only when an infantry unit ends the entire move phose -- not just a march -- in an enemy box does it become captured. Captured enemy territories are marked with a flag of the capturing player's nation.
In this example, the Union player has 2 PUs at the start of the movement phase. He buys one march and moves the infantry from Nashville to Sparta. The unit encamps, but no flag is placed as the movement phase is not over. The player buys a second march, and moves the infantry to Chattanooga, where it encamps and, because movement is over, a flag appears. Sparta reverts to gray.
The flag represents a small garrison detached from the main unit, necessary to maintain control over enemy territory. Cavalry units on their own do not detach garrisons. A cavalry unit only has control of a city while it's in it.
However, while a blitzed-through territory is temporarily a player's color, it may be considered friendly for the purposes of moving other units to or through it. This is especially advantageous to the North player for naval moves. A cavalry unit blitzing through a port, for instance, opens it up for naval transport.
In this example, the North player has a cavalry unit encamped at Goldsboro. He can use a march to blitz through Wilmington to Florance. After the march, both Goldsboro and Wilmington will revert to gray. However, on the same march, since Wilmington is temporarily a "friendly" port, he could also naval-transport a unit from a Northern port into Wilmington.
Blitzing is not possible through enemy-occupied territories, but for this purpose, a garrison doesn't count as an occupying force. Infantry and cavalry may move into a box containing an enemy army but must stop there; if there's only a garrison, they may blitz through. The garrison is removed and the box reverts to its original color, effectively liberating the box.
If an army in a box with an enemy army gets a second march during the same move phase, it may move out into friendly territory, but it may not blitz through into any enemy territory at all, occupied or not by troops.
(This is one reason that the cavalry jump move is effective -- it allows the unit to bypass the enemy-occupied territory altogether.)
Purchasing marches During the movement phase of his turn, each player "purchases" and places a number of marches. Depending on his choices, units will get one or two chances to move.
At the beginning of the move phase, a die is rolled for the player. The results display in the dice box east of Fredericksburg in the Atlantic. A roll of 1 is treated as 2, so 2 is the lowest (and most common) roll.
For each number rolled, the player gets a PU to spend on a march -- or on entrenchments, which act as marches but also provide defensive bonuses explained below.
Marches may be placed in any box a player controls with an encamped army, one march per box. That army's camp is removed (as is the march icon), and that army may move as described above. After movement, armies encamp again.
If a player does not spend all his PUs on the first move, he may purchase additional marches (or entrenchments). Those can again be placed with any encamped army, including one that just moved. In this way, all units may participate in up to two marches per turn.
Players only get two chances to buy marches. Any PUs not spent in this process are lost.
Note that on the first turn, neither side is deemed very organized and each only gets 2 PUs to spend on marches. On subsequent turns, each will get 2 to 6, determined by a roll of the die.
In the above example, the South player wants to take Chillicothe. He has 3 PUs to spend. If he spends them all at once, he could move his armies from Parkersburg and Charleston, W.V. into Chillicothe, but only the cavalry from Franklin. If, however, he buys only 2 marches and saves a PU, he could do this on the first move:
Then he could spend his remaining PU on another march and move the whole army into Chillicothe, including the infantry which started the turn in Franklin.
Naval transport and naval assault Due to its naval superiority, the North may make moves by sea. On any turn on which he controls at least two port cities (ports contain an anchor icon), and has an army in at least one of them, the Union player gets ship icons in the transport box in the Atlantic.{| border="0" cellpadding="5" | align="center"| | align="left" valign="top"|Atlantic City, a port city, with an encamped infantry. If the icons in a box obscure information, players can access it by mousing over the city.
Details show in the info bar in the lower-left corner of the screen, in this case that Atlantic City is both a port and a North recruiting city:
|-
| align="center"|
| align="left" valign="top"|The ship icon displays in the transport box in the Atlantic when the North has a legal naval transport move available. It functions like the other transport lines in the game -- troops board and disembark on the same move or are lost if left on board. Troops may embark from and disembark to any friendly port city.
|}
A naval assault may be performed only if: (a) the North rolled a 6 for marches and (b) the North has an army in Washington. If the North player meets these requirements, even on the second march purchase of a turn, he has the option of purchasing one or more naval assaults. (He need not have 6 PUs left on the second march purchase, but be must have initially rolled a 6.) Then he may purchase naval assaults at a cost of 1 PU each:{| border="0" cellpadding="5"
| align="center"|
| align="left" valign="top"|Since naval assault costs 1 PU, the most the North can buy is 6.
Naval assaults must be placed in the assault box in the Atlantic:
Placing any number of naval assaults also places a march in Washington.
Both infantry and cavalry may board naval assaults from any port (if they have a march), but only one per naval assault purchased. If the player bought 3, for example, no more than 3 units may board.
Units must board and disembark naval assaults on the same march, or they are lost. Naval assaults are removed after the march on which they're placed; they do not remain for use in a second march.
Units aboard a naval assault may disembark at any port, friendly or enemy.
|}
Ft. Monroe
The guns of Ft. Monroe command the Chesapeake Bay, making this a critical installation for the North, and a vulnerability for the right flank of Richmond.
If the South controls Ft. Monroe, the North may not conduct naval assaults of either Yorktown or Norfolk. The North may assualt Ft. Monroe, of course. And transport moves to Yorktown or Norfolk are allowed if they're friendly.
BATTLE Once a player finishes moving, if any of his units are in the same box as enemy units, battle ensues.
Infantry and cavalry roll at their strength values on both offense and defense, subject to certain modifiers.
Battle modifiers There are several elements in the game which modify units' strength ratings for a given battle. Different modifiers can combine with cumulative effects.
Entrenchments provide a defensive advantage. Entrenchments may be purchased and placed during the movement phase. Only one entrenchment may be placed in any box. Four boxes on the map are considered permanently entrenched -- Washington, Richmond, Ft. Monroe, and Vicksburg. No further entrenchments may be placed there.{| border="0" cellpadding="5" | align="center"| | align="left" rowspan="2" valign="top"|There are two kinds of entrenchment available for purchase. The one labeled with an R costs 1 PU and may only be placed in "recruiting" boxes. These are cities which have number in a small inset box of blue or red. Recruiting is explained below.
The other costs 2 PUs and may only be placed in nonrecruiting boxes, those with no inset numbers.
Both provide exactly the same defensive advantage: They reduce all attacking units' strength by 1.
|-
| align="center"|
|}
Placing an entrenchment in a box also provides the army there with a march. So some, or all, of the units there may be moved.
However, entrenchments only last while there's an army with them. After any given march, an entrenchment in a box with no army is removed. Entrenchments cannot be moved.
The permanently entrenched boxes of Washington, Richmond, Ft. Monroe, and Vicksburg always provide the defensive advantage of subtracting 1 from each attacking unit's strength.
Water crossings provide a defensive advantage by adding 1 to the strength of all defenders. They may also be used as casualties in battle, adding a hit point to the defender.{| border="0" cellpadding="5" | align="center"| | align="left" valign="top"|When armies are forced to cross water during an attack, they're slow and exposed, making them more vulnerable to enemy fire. Any number of water crossings on the defender's side raises all of his units' strength by 1. Multiple water crossings do not raise the defenders' strength further, but each may absorb a hit in battle. |} Water crossings are placed in cities with water borders when enemy units can enter them only over those borders. There are 15 cities on the map with one or two water borders.
St. Louis has water borders to the north and east. Units crossing into it from (or through) Quincy, Springfield, Ill., or Vandalia, must cross the water since the connections between them and St. Louis are on the sides of the St. Louis box covered by water borders. Units entering St. Louis via any of the other connected cities -- Cairo, Ironton, Rolla, Jefferson City, or Macon, Mo. -- do not have to cross the water borders.
The mechanism for placing water crossings in a defender's city is based on possible moves. For each enemy army with a march which can only reach the city over a water border, a water crossing is added after marches are placed but before movement. For each which can reach the city without crossing a water border, a water crossing is removed. Let's look at an example, with the Confederacy holding St. Louis, and the Union preparing to attack:
In this example, the North has placed 3 marches with units in Quincy, Bloomington, Ill., and Vandalia. All three can reach St. Louis, but only over the water borders. Therefore, 3 water crossings are placed in St. Louis. Now let's say the Union also had an army which could reach St. Louis from a connection which doesn't cross a water border:
The infantry in Cairo also has a march, and can strike St. Louis from the south. Since that connection does not cross a water border, a water crossing is removed from St. Louis, leaving 2. Let's take it one step further:
Here, the Union also has a cavalry in Quincy. The effect is that the infantry units in Vandalia and Quincy and the cavalry in Bloomington, Ill. each add 1 water crossing. The infantry in Cairo removes 1, as does the cavalry in Quincy, since it can blitz through Macon, Mo. and hit St. Louis from the west. The result: 3 added and 2 removed, 1 remains.
After water crossings are placed, if no army ends up moving into St. Louis, they are all removed before the next marches are bought, and the reckoning begins again. If an army does cross into St. Louis, any water crossings remain while further additions and subtractions are made on the following march, if any, before the battle.
Naval assaults conducted by the North also count as attacks across water. Whenever the North places any number of naval assault units on the board, every South-owned port city with an army in it gets a water crossing. A land-based Union army which has a march and can reach the city will remove the water crossing.
Crack infantry are the toughest troops on the field. Not only do they fight at a strength of 3, but they reduce the strength of up to two opposing units by 1 each on either defense or offense.{| border="0" cellpadding="5"
| align="center"|
| align="left" valign="top"|For each crack infantry on either side, up to 2 enemy units lose a strength point while the crack infantry is in play. Crack infantry also affects enemy crack infantry.
|}
Generals become available to players during the course of the game. There are three. They are placed during the recruitment phase of the appropriate player's turn during the month referenced below. The following year, their statuses change due to promotions for Grant and Sherman and the loss of "Stonewall" Jackson for Lee.{| border="0" cellpadding="5"
| align="center"|General
| align="center"|Available
| align="center"|Initial strength
| align="center"|Status change
| align="left"|New strength
|-
| colspan="5"|
|- | align="center"| | align="center"|Jan./Feb., 1862 | align="center"|1 | align="center"|June, 1863 | align="center"|2 |- | colspan="5"|
|- | align="center"| | align="center"|May, 1862 | align="center"|1 | align="center"|August, 1863 | align="center"|2 |- | colspan="5"|
|-
| align="center"|
| align="center"|June, 1862
| align="center"|3
| align="center"|September, 1863
| align="center"|2
|}
A general's strength rating is added to his troops when he's with them in battle. For each point of strength he has, he raises one unit's strength by 1. So when they're first placed, Grant and Sherman can each raise a single unit's strength by 1; they may be present at the same battle with cumulative effects. Lee originally can raise 3 units' strength by one.
Generals do not otherwise participate in battle. If on the losing side, they are temporarily removed from play but may be placed again on the recruitment phase of the player's next turn.
When a general's status changes -- that is his strength goes up a point (Grant, Sherman) or down (Lee) -- he loses a march. He may only move on the second march of that turn.
Generals may move independently of troops on each march at no cost. They may move two boxes during a march, and can enter enemy territory but not capture it.
Generals may be placed in any box containing friendly troops; it need not be a recruiting city. They may not be placed in boxes containing no troops.
Cumulative modifier effects The effects of various modifiers on each side add up. Let's look at an example:
Above we see an evenly matched fight at Chattanooga. On both sides, the veteran infantry rolls at 3, the militia infantry and veteran cavalry roll at 2, and the militia cavalry at 1. Let's add a modifier:
The South has an entrenchment at Chattanooga, which lowers all the North's units' strengths by 1. This leaves the militia cavalry with no shot at at all. It may still be used as a casualty, but it cannot get a hit. To even things up a little, let's give the North an advantage:
One of the Union militia infantry has been swapped out for a crack infantry. Because of the entrenchment, it rolls at a 2 as the veteran does. But now two of the South units have their strengths reduced by 1. One South militia infantry now rolls at a 1, and the militia cavalry cannot roll at all.
Taking things a step further, let's say the North army had to cross water into Chattanooga. The South player now has a water crossing, which raises his units' strengths by 1 as long as it's in the battle.
Finally, we add a general to the North. In this case Grant, after he's got his promotion and brings 2 strength points to the battle. These bring up the North's militia cavalry which had been at 0 back to 1, and its militia infantry which had been at 1 to 2.
This process is followed for each battle, which each modifer adjusting units' strengths.
Army maximums and capturing cities Capturing cities from the enemy not only changes the strategic situation, but can also have an economic impact. Many of the cities on the board are what's known as recruiting cities -- they have numbers in small inset boxes of red or blue. Some have boxes of each color. The red boxes count for the Confederacy, the blue for the Union.
A player's army maximum, the total number of infantry and cavalry he's allowed to have on the board, is determined by the sum of all the numbers of the appropriate color in all the cities he controls. When cities change hands, these numbers change.
Players' current army maximums are kept track of on the calendar in the lower-right corner of the board:
{| border="0" cellpadding="5"
| align="center"|
| align="left" valign="top"|The North starts with 34, the South with 29. Later, during the recruiting phase, players will have the opportunity to bring new units into play, but in so doing may not exceed their army maximums.
If the army maximum of a side drops below its current unit count due to city losses, the player does not lose units, but cannot recruit any new ones till his army maximum is greater than the number of units he has in play.
The recruiting maximum, explained below, dictates the maximum number of militia units.
The check boxes for drafts and border states indicate permanent recruiting maximum increases. This is explained below.
|}
PROMOTIONS
Immediately following the battle phase, a promotion icon is placed in the boxes of all victorious armies of both players.
{| border="0" cellpadding="5"
| align="center"|
| align="left" valign="top"|The promotion icon -- a medal -- allows the player to purchase and place a veteran or crack unit to replace an existing unit, upgrading it to the next rank: militia to veteran, veteran to crack. Crack units may not be upgraded further.
The promotion icon only appears if there are promotable units in the box; if all remaining units are already of crack rank, no promotions are possible.
|}
The upgrated unit must be placed in a box containing a promotion -- a victory in one city does not allow you to promote a unit in another.
In addition to the automatically placed promotion for winning battles, each player is allowed one "political" promotion per turn. He gets this political promotion each turn, whether he won any battles or not. It is placed in the production queue and may be built by players in any box containing promotable units which does not already have a promotion.
After promotions are placed, the player must purchase upgraded units, one per promotion. They may be placed anywhere there's a promotion, removing the unit to be upgraded and the promotion upon placement.
Players must take care only to purchase promotion upgrades they can place. Any unplaced upgrades are lost. Players may not "bank" promotions or upgraded units for subsequent turns.
If a player earns a promotion on his opponent's turn through a defensive victory, that promotion is used at the very beginning of his next turn, before marches are purchased.
RECRUITING After promotions, players have the opportunity to recruit 2 to 6 new militia units, subject to certain restrictions explained below.
The number of recruits he is allowed to purchase is governed by the second die roll of the turn, with results displaying in the dice box east of Fredericksburg in the Atlantic. Rolls of 1 are treated as 2.
Army maximum A player may not purchase recruits which would bring his total army size -- the number of infantry and cavalry he already has in play -- above his army maximum as tracked on the calendar.
The army maximum changes during the game as recruiting cities -- those with red or blue numbered inset boxes -- change hands. If a player's army maximum drops below his current unit count, he does not lose units, but cannot recruit new ones.
Recruiting maximum A player may not purchase recruits which would bring his total militia count above the recruiting maximum listed on the calendar for infantry or cavalry respectively.
At the beginning of the game, the North's recruiting maximum for infantry is 12, the South's is 8. Both sides have a cavalry recruiting maximum of 1. Cavalry recruiting maximum remains at 1 for both sides throughout the game, but various events can raise the infantry recruiting maximum.
Players may have more than those totals of each kind of unit including higher ranks, but are restricted to those maximums for militia specifically.
Militia units are removed from play through battle casualties and promotion, making them again recruitable, up to the maximum.
So in addition to the die roll which governs how many new units a player may recruit, these maximums limit it. This is handled via resources required to place new units. Each infantry costs not only a PU, but also an "infantry_max" resource and an "army_max" resource, which prevents players from buying units which would exceed the maximums tracked on the calendar. (There's also a "cavalry_max" resource.)
An example:
In the above example, while the North player rolled a 6 for recruiting and has 6 PUs, he's already got 10 militia infantry on the board, leaving him only 2 infantry_max resources. So the most infantry he can recruit is 2. He also has 1 cavalry_max resource available, so his total purchase can be 2 militia infantry and 1 militia cavalry. He doesn't get to "bank" the extra 3 PUs, though; they are lost.
Similarly, if he had more PUs than army_max resources, he'd be limited in his purchases to the number of army_max resources he had.
Drafts The Union conducts three drafts in the course of the game, in April of 1862, 1863, and 1864. During each, the Union's infantry recruiting max is permanently increased by 4, for a total of 24 after the last draft.
Draft increases are tracked on the calendar with X's in the draft check boxes.
Border states It was a great hope of the Confederacy that the border states of Missouri, Kentucky, and Maryland would provide more support for its cause. In history, each was a source of volunteers for the Confederate ranks, particularly Missouri. Missouri was home to strong secessionist sentiment, with the party going so far as to form a government, which never controlled much territory and was ultimately driven into exile.
Kentucky tried to remain neutral, but was forced to call on Union aid after Confederate forces struck.
In the game, Confederate success in these states leads to an increase in the infantry recruiting max for the South.
At the beginning of the first South turn on which the South controls all the recruiting cities in any of these states -- St. Joseph, St. Louis, and Springfield for Missouri, Bowling Green and Louisville for Kentucky, and Baltimore for Maryland -- the South's infantry recruiting maximum is permanently increased by 1. The bonus is not removed if the South loses these cities.
Border state bonuses are kept track of on the calendar with X's in the appropriate checkboxes.
Placing new recruits Militia recruited by either side are immediately available for placement, even in cities just captured. The city must contain a recruiting value (number in an inset box) of the appropriate color, blue for the North, red for the South. Regargless of the recruiting value in the box, only 1 unit may be placed each turn in any recruiting city, and the city must currently be under the player's control. Note that cavalry, though it doesn't place a garrison, controls a city while in it, which makes it availble for recruiting if it has a recruiting value of the appropriate color.
No city may recruit more than 1 unit each turn, regardless of its recruiting value.
There are more South recruiting cities in Northern states than vice versa, which must be taken advantage of by the South player if he's to win. The North is likely always to outnumber him, so the South player needs to take advantage of the opportunity to place new units in captured North cities with red recruiting values.
The notable exception to this general rule is Knoxville, which recruits for the North. There was strong Unionist sentiment in east Tennessee, which nearly led to a "counter" secession before Union troops took control of the region in 1863.
VICTORY Play continues till one player achieves his victory objectives.
A victory notification appears immediately when one side meets its victory objectives.
The South has three ways to win:
- Capture Washington. If the South captures Washington, the North has its next turn to liberate it. If it fails to do so on that turn, the South wins.
- Economic victory. The South player immediately wins if, following his battle phase, his army maximum is greater than the North's.
- Attrition. The South wins if the Union has not won by the end of the Union battle phase on round 40, which is June, 1865.
The Union has only one way to win. By the end of its battle phase in June, 1865, it must have captured all Confederate recruiting cities of value 2 or 3. These are: Richmond, Wilmington, Charleston, Atlanta, Memphis, Mobile, and New Orleans.
Immediately following the North battle phase on which he captures the last of these cities, the North wins. |} Based upon the game A House Divided